Showing posts with label models own. Show all posts

Monday, 17 November 2014

nail art: an easier way to marble

I have now (well my dad has now) invested in a tripod so I can film all my tutorials from now without the scary balance of my phone on a stack of books! SO without further a due I give to you my dry marbling tutorial!


This design is a super easy way of getting an interesting 'how did you do that?!' design. It works great as a feature nail and you can use just 2 colours or as many as you want!

I used:
  • Models Own Polish in Pukka Purple
  • Barry M Nail Paint in Matt White
  • GOSH Cosmetics Polish in Deep Purple
  • Maybelline Super Stay 7 Days Polish in Crystal Clear
  • 1 small dotting tool (smallest you can find - a needle or anything sharp & pointy can work)

Tips:
  • Use a fair bit of polish for your base colour
  • Act fast
  • EXPERIMENT with design
  • I use my nail to clean up any wonky lines or leaks in the polish (this can happen when applying a big dollop at once.. use a fine brush dipped in polish remover if you aren't a fan of the nail to nail clean up I use)
  • Enjoy :)

Sunday, 1 June 2014

the nail art update: twisted manicure and matt glitter

Another weekly nail art update coming your way boys and girls! This week I have two cool and easy designs and a quick tutorial for a twist on the classic French Mani.

Firstly this is the design i did for my night out in Camden with my best friends from back home! I used my new GOSH matt polish, a lovely powder blue called Frosted Soft Blue that i LOVE!
I used a sponge to sponge on some pale blue polish and my glitter polish on top of a deep green to create a soft sponged effect. 


The next mani i did this week is my funky twist on the classic French manicure. Instead of classic white tips I chose to do a few layers of pink and purple shades. To do this i uses the below brush, long and thin in slow steady strokes to get a neat line.


Apply one colour at a time, two coating if the polish is needs it to create a solid colour. This layer is in Cheeky Purpl-exed.


Next layer is Models Own in Pukka Purple.


This next layer is Models Own in Dinky Pinky...


Another layer of Cheeky Purpl-exed..


When I first did this design I coated it with my pink tinted Cheeky matt polish and used two layers only...


Then when I did the tutorial to show you all, I used four colours as you can see above and ended up with the below.. 


Saturday, 24 May 2014

the nail art update

So, as it is quite long and complicated to do tutorials for all the nail art I do they don't all get post on here as I think just posting them without any deets is a tad boring.. But then if you don't follow me on Instagram you won't get to see all my nail art. Hence the nail art update comes into play. Once a week I am going to post a nail art update with my latest nail art, the inspiration for it, and maybe a little bit about the technique/tools and polishes I used. How's that sound? Sounds good to me.

Nail art challenge May by @califonrnails on IG - Aztec

I have done aztec style nails before, they took a very long time while I was cooped up in hospital and so turned out terrible haha, so I was going to just go with this design again but with funkier summer colours. Then I decided - something different is always more fun. So I googled 'aztec design' and looked at all the different designs and where aztec pattern actually comes from to create these -


They took me an hour and half for this hand alone! - I took my time as it is a very complicated design with a  lot of colours and a few mistakes may have been made. I used my nail art long thin brush for all the art work except the black, where I used my nail art pen - with needle. The rule with this design is to neaten with black. So apply all your colours and if they aren't perfect, don't worry - apply your black with a  precise needle/pen like this one to neaten up your design! and remember a nice top coat smoothes out everything. I used a LOT of polishes for this design so I'm not going to list each one.. (sorry!)

WAH nails inspired Spiderman Design for Shauna the Spiderman fan

My little Irish friend Shauna is the biggest fan of Spiderman I've ever come across. And when our friend Ella came across Spiderman nail art by the WAH girls of Topshop, it had to be done. Et voila - 


Using my black nail art pen again and GOSH nail polish in Lambada. All this design takes is a steady hand and half an hour :)

My new dotting design

Always wanting to do something new, after the epic, my new all time favourite, aztec nails I knew I had to do something new, but didn't have the time to match the aztec. So I went with this new simple dotting design - 


I used a small dotting tool to do the dots, easy peasy, one colour at a time. The base coat is NYC In A NYC Minute 325 Raindrop Quick Dry Nail Polish and the dots are in Models Own Dinky Pinky & Pukka Purple, GOSH Peachy & Balloon & Lambada.

Then my little friend Chloe insisted I do the same for her - 


So there we have it - the first ever nail art update.
Hope you enjoy! And are inspired to try some yourself, because they aren't as hard as you think!

Saturday, 15 March 2014

how to create a funky flower nail bed

Spring is here! It must be given all this lovely sun. I love this time of year when the sun is out and warm but it is still breezy and cool.. The time of year I don't have to wear suncream!

So in hope that this summer will last, I rejigged my previous floral design (see it here in the original post) and have done a little tutorial, a wee step by step for you to kick start your summer!

What you need:

NYC In a Minute
Nails Inc Gel Effect in Mayfair Lane
Gosh in Splish Splash and Misty Mauve
Models Own in Pukka Purple
Rio Professional Nail Pen in Bright Pink
Sally Hansen Insta-Dri Top Coat
Sally Hansen Diamond Strength Base Coat
Dotting Tool


1. Apply your base coat , then on top give yourself a nice generous coat of your base colour (I used my NYC shade of blue). 

2. Use the larger end of your dotting tool to create the base of your flower (or the petals if you will) dotting in a circle and then filling the centre (you can use as many colours as you like here but make sure you have a lighter shade in them for the next step), like below:


3. Use the smaller end of your dotting tool (the smallest you can find) and put little dots on your flowers to create a more textured/3D effect in lighter shades, like below:


4. Now, again with your smallest dotting tool, ad some little green leaves. by placing your tool down as though creating a dot, but dragging to the side slightly as you pull away (don't worry about it being perfect, not all leaves are the same!), like below:

5. Apply your top coat et voila! TIP: Always use a base coat when applying nail art/design/dots of any kind as a good top coat smoothes out everything!


Hope you like and find it as easy as it is!

@pawsandclaws101 - Always Instagramming
@pawsnclaws101 - And Tweeting

xxx


Monday, 17 February 2014

sex and the citygal

I accidentally posted this the other day and hadn't even uploaded the pictures! typical me.. didn't notice till two whole days later. If I had a brain I'd be bloody dangerous!

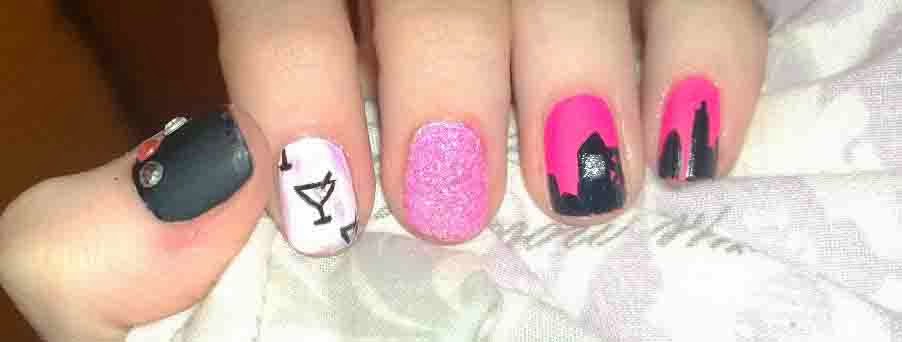
Moving on from my tendency to be a numpty.. I was offered an amazing position at the PR agency I work for, Imagination, last week and it means I can stay in London until July like I originally planned before my previous employer had to let me go. No hard feelings.. not know I'm working for brands I actually like! So I concluded after much turmoil and struggle over the past few months I am officially a citygal again - and in celebration of this wonderful fact I did some sex and the city inspired nail art.. Hope you like :)


I used my new Andrea Fulerton Glitter Kit, Color Show in Blackout and Winter Baby and Models Own in Hot Pink as my bases. I also popped some little glitzy gems on for extra girly factor.. even if they did fall off after a day of running my hands through my super smooth hair. I also used my GOSH silver glitter nail polish for added glitter on the Big Ben I included in my city landscape. I loved drawing my little comso glasses.. now if only I had a full sized one in my hand as well...

xxxxxxxxxxxxxxxxxxxxxx :)

@pawsandclaws101 my instgram
@pawsnclaws101 my tweetgram

Wednesday, 5 February 2014

Inspired by Armani

After flicking through my Catwalk Edit by Vogue for Spring/Summer, very late in the month I might add, I thought about the inspiration I could get from all the fabulous designers and their amazing designs. One that stood out big time was Giorgio Armani - I took the below design and gave it some balanced bright colours so make a little inspired simple nail art. All it took was some sponging and splodging and dotting and dipping... oh and some silver foils.


I used a base coat of Models Own Feeling Blue and Sophie's Pink for the large flowers, I sponged on smaller flowers with B. Complete Mulberry and topped it off with Sally Hansen's Insta-Dry top coat.


And here are the results :)


See yah soon x

@pawsandclaws101 GRAM
@pawsnclaws101 TWEET