Showing posts with label pink. Show all posts

Saturday, 31 January 2015

paisley video tutorial


Paisley is the first design I did with my original Rio Nail art pens, I now use a very thin design brush and dotting tool. For this particular sweet pink design (perfect for valentines day) I used Avon Pink Creme Nail Enamel and B. Complete Red Nail Polish, I topped it off with Cheeky's Matte Polish.
Please like, love or hate my YouTube video and subscribe or unsubscribe to my channel here.
Good Luck ladies.

Saturday, 5 April 2014

voulez-vous

so tonsillitis has struck again, that is why I've not been able to post again this week :'(
I have many many lovely ideas for posts but one thing after the other means you will have to wait. I am going home this week and to a friends for a few days. I'm hoping to do some posts there so you can see what I think of my their beauty hoarding, as I know my mother's compares to mine in no way at all, it will be very specific and fun to see where I get my beauty tips from. 

I just wanted to let you all know this and show you my classic french manicure :) I used the urcheeky crush on you matte nail polish over the top of my Andrea Fulerton white polish tips, that I did freehand (practice makes perfect but a tip for this is use a slanted straight brush to neaten up the line).


xxxxxxxxxxxxx BAHBYE xxxxxxxxxxxxxxx


Saturday, 15 March 2014

how to create a funky flower nail bed

Spring is here! It must be given all this lovely sun. I love this time of year when the sun is out and warm but it is still breezy and cool.. The time of year I don't have to wear suncream!

So in hope that this summer will last, I rejigged my previous floral design (see it here in the original post) and have done a little tutorial, a wee step by step for you to kick start your summer!

What you need:

NYC In a Minute
Nails Inc Gel Effect in Mayfair Lane
Gosh in Splish Splash and Misty Mauve
Models Own in Pukka Purple
Rio Professional Nail Pen in Bright Pink
Sally Hansen Insta-Dri Top Coat
Sally Hansen Diamond Strength Base Coat
Dotting Tool


1. Apply your base coat , then on top give yourself a nice generous coat of your base colour (I used my NYC shade of blue). 

2. Use the larger end of your dotting tool to create the base of your flower (or the petals if you will) dotting in a circle and then filling the centre (you can use as many colours as you like here but make sure you have a lighter shade in them for the next step), like below:


3. Use the smaller end of your dotting tool (the smallest you can find) and put little dots on your flowers to create a more textured/3D effect in lighter shades, like below:


4. Now, again with your smallest dotting tool, ad some little green leaves. by placing your tool down as though creating a dot, but dragging to the side slightly as you pull away (don't worry about it being perfect, not all leaves are the same!), like below:

5. Apply your top coat et voila! TIP: Always use a base coat when applying nail art/design/dots of any kind as a good top coat smoothes out everything!


Hope you like and find it as easy as it is!

@pawsandclaws101 - Always Instagramming
@pawsnclaws101 - And Tweeting

xxx


Tuesday, 4 March 2014

gelly on a plate

Finally decided to give this gel effect varnish craze a go as the idea seemed interesting. And even though I've never had the real thing .. My friends and mum get them regularly and recommend them for their long lasting quality and no chip policy. However appealing this sounded I was never keen to invest due to fact I have a tendency to change my nails 2-3 times a week (I've even had those rare quiet weeks where I've had time to redo them every day)...

So, this alternate polish sounded really quite perfect. I picked the Mayfair Lane shade by Nails Inc and gave it a glitter tip and even added, on researching, a non chip coat of my all time love, Sally Hansen Insta-Dri Top Coat.


The result?
I loved the result, I was expecting a really thick consistency but it went on and felt like a regular polish. Once it had dried it just looked and felt the same as a good polish... no different really.
The chipperness?
I don't really have a job that means I am prone to chipping my nail varnish however I always manage to somehow. So, I was bound to chip them .. and so I did today.. I applied the nail varnish 3 days ago and honestly this is 2 days over my average wait to chip a nail. So I was impressed with the wait.. I think on anyone else it would have been a week!

The aftermath?
The only thing I am not very impressed with this polish is that my nails now feel really brittle and they were just starting to feel strong.. especially the tips where I've been chipping away the nail polish on the tube ride home, which means I have broken two of my nails ahhh!

I think despite the aftermath, if I treat my nails with something, the polish is successful in it's mission and I do think I'll invest in some more gel effect polishes. Will you?

Sunday, 23 February 2014

giving in to the gradient

So I promised all my insta-followers I would pop up a tutorial of the latest marbling I've done.

This is probably my favourite design (however it's not in my favourite colours) and I am going to do a black/white version tonight (for a little competition) that I'll post up tomorrow for you all to see. Either way everyone that has seen them has asked 'How did you do that?' 
And when I say 'With a tool, its actually much easier than it looks' - They do not believe me! 
So a quick tutorial to show how easy it is is just want we need. I'd love to do a video but I can't video myself! - however much a tried holding the camera with my chin/propping it up on my dvds/getting my teddy to hold it - I failed everytime.

Hopefully though this step by step will still help and you can have a go yourself and instagram/tweet me the results because I would love to see if it really is as easy I think!

what you need:  
a small dotting tool/needle if you don't have tools
two shades of polish you think work perfectly together - 
I chose Cheeky's Minted and Purpl-exed shades (these are currently available on the website at £7.00 each, just click the names to get to wear you want to go)


step one
 Apply - to a primped and prepped nail with a shiny base coat - your first polish to the bottom half of the nail like below, (don't worry if it isn't neat or straight or over half way for that matter).


step two

Apply your second polish to the top of the nail - making sure as much of the nail is covered as possible, like below:


step three

Now, quickly before it dries, swirl the tool/needle through the nail polish. Working from one colour to another in circle motions creating the below:


Now if you aren't happy with your design you can always redo it, like I did...


Once happy with your design you can carry on with the rest of the nails and then give yourself a shiny or matte top coat and you can end up with something like the below:


You can use this design as a feature nail or use three colours to make things more interesting!

Have fun lovelies x

@pawsandclaws101 for instagramming
@pawsnclaws101 for tweeting

Monday, 17 February 2014

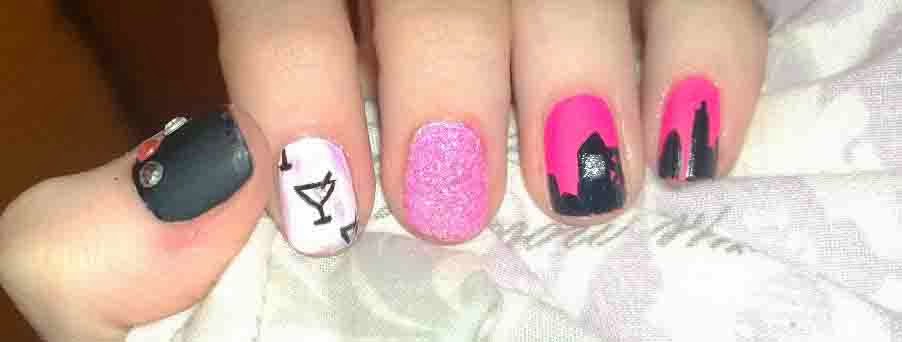
sex and the citygal

I accidentally posted this the other day and hadn't even uploaded the pictures! typical me.. didn't notice till two whole days later. If I had a brain I'd be bloody dangerous!

Moving on from my tendency to be a numpty.. I was offered an amazing position at the PR agency I work for, Imagination, last week and it means I can stay in London until July like I originally planned before my previous employer had to let me go. No hard feelings.. not know I'm working for brands I actually like! So I concluded after much turmoil and struggle over the past few months I am officially a citygal again - and in celebration of this wonderful fact I did some sex and the city inspired nail art.. Hope you like :)


I used my new Andrea Fulerton Glitter Kit, Color Show in Blackout and Winter Baby and Models Own in Hot Pink as my bases. I also popped some little glitzy gems on for extra girly factor.. even if they did fall off after a day of running my hands through my super smooth hair. I also used my GOSH silver glitter nail polish for added glitter on the Big Ben I included in my city landscape. I loved drawing my little comso glasses.. now if only I had a full sized one in my hand as well...

xxxxxxxxxxxxxxxxxxxxxx :)

@pawsandclaws101 my instgram
@pawsnclaws101 my tweetgram

Wednesday, 5 February 2014

Inspired by Armani

After flicking through my Catwalk Edit by Vogue for Spring/Summer, very late in the month I might add, I thought about the inspiration I could get from all the fabulous designers and their amazing designs. One that stood out big time was Giorgio Armani - I took the below design and gave it some balanced bright colours so make a little inspired simple nail art. All it took was some sponging and splodging and dotting and dipping... oh and some silver foils.


I used a base coat of Models Own Feeling Blue and Sophie's Pink for the large flowers, I sponged on smaller flowers with B. Complete Mulberry and topped it off with Sally Hansen's Insta-Dry top coat.


And here are the results :)


See yah soon x

@pawsandclaws101 GRAM
@pawsnclaws101 TWEET