Showing posts with label superdrug. Show all posts

Wednesday, 9 July 2014

500 products of summer (almost!) part 2: everything

I really couldn't nail a theme for the products I selected for this post. I wanted to do the 5 senses until I realised tasting and hearing beauty products wasn't really as possible as I thought it would be. I also then realised i had originally decided to only do 2 posts so had to cram everything in - Now the 500 products of summer posts will be a 4 parter of colours, everything, nail art and protection. Hope you are as excited as I am!


Summer for my face...
will be hopefully as exciting as summer gets for a face. I have a lot of products I use for my face, I try to keep them pretty regular so not to disturb the PH balance or get a reaction to new products but I do love to try new things! (Hence why we are all here today). I have added a few new and exciting products to my face routine such as oils, day creams and masks but I picked these products as they were specific to my summer needs.


In the summer my face gets quite red and warm - meaning it sweats! - so I have to protect my make up. I try not to wear a lot in the summer but when you have work and then parties and birthdays and dinners and nights out planned you can't not put on a bit of tutti. To make sure my make up sets and stays where it is I have started using UR Cheeky Freeze Frame, which is a makeup setting spray. I never knew these existed until a few months ago, I used to use hair spray to set my make up as I am sure most of us do - but I can only imagine that that is terrible for your skin. This spray is light and non sticky (unlike Asda's own extreme hold hairspray) and actually does the trick of keeping my foundation and eyeshadow pretty perfect for longer!


To wipe away the end of the day make up we all love so much I have started using these Vitamin E by Superdrug Facial Cleansing Wipes - I LOVE these wipes due to my ever talked about appreciation of Vitamin E with all it's healing qualities, and the fact they smell gorgeous. I have taken a step away from my long routing, these are much easier and quicker for cleansing after a long day at work.

Shiny & sleek strands 


Once I have a hair cut my hair will be in perfect condition for now I have to take extra care of my dry ends and dull colour, i am dying for a trim (it's only been 7 months eek). To keep my hair perfect this summer I will use a lot of sleeking and shining and taming products alternatively, depending on how my hair feels. It's an ad hoc kinda deal. My current favourite product for my hair is Color Wow's Pop & Lock, which is perfect for summer - it is a just-in-time addition to my dressing table. This crystallite shellac is different to your regular hair serums as they would normally sit on hair, where as this non sticky shellac sinks in and protects the hair from toxins while blocking out toxic bits and bobs (we don't need technical terms here!). It makes your hair shiny and sleek like you have just stepped out the hairdressers. I use it pre-blow dry on wet hair and give myself a salon style blow dry for the best results, but you can put it on dry hair and dry it through roughly with a brush too if you prefer.

Skin that is ready for the sunshine...


No matter how pale. Aside from the obvious protection (which I will elaborate on in my next 500 products post) my skin has to have extra special treatment during the summer. Starting with cleansing, in the summer I use a creamy and milky shower gel as apposed to my usual clear fruity ones because my skin can get quite dry when it it dries after a shower I have to give it as much moisture as I can, this summer I have got (the same as last year!) Soap & Glory Clean On Me Creamy Shower Gel. It has a lovely orange scent to keep me fresh and summery smelling and a creamy and silky texture and built in body lotion that leaves my skin feeling utterly gorgeous.


After I have showered with this in shower gel I still need to moisturise to lock in the nourishment, here I will be using Nip + Fab Yoga Blend Body Lotion with yummy and scrummy lavender, coconut and rose. It's really lightweight so perfect for summer, and I tend to shower in the evening in the summer so it's unwinding and de-stressing lavender scent will help me wind down after an exciting day in the sun!


My skin can dry out over night too in the summer annoyingly so I can loose some of that lovely silkiness from my evening lotion, so to wake me up for my day and keep my skin refreshed and nourished I will use Aromatherapy Associates Revive Body Gel. This fragrant gel sins into the skin so quickly and wasn't at all as thick and gloopy as I first expected, it's so easy to apply and soothes the skin as well as evening out my skin tone and texture (sounds lovely doesn't it?)

Don't let those cuticles dry out


I have to keep on top of mositurising my hands in the summer, but I always manage to get dry and flaky cuticles (not pretty when you take so many pictures of your nails). I will be using the wonderful Sally Hansen Gel Cuticle Remover, it has a built in pusher tip so you don't need all the tools of the trade to keep your cuticles perfect. it is so easy to use - it makes manicures easy and keeps my cuticles looking very pretty.

Hairless legs


Avoiding waxing my own legs after waxing my friends I turn to the second best thing in hair removal. Veet hair removal cream is miraculous, it gets rid of all the hairs so quickly. I put it on before my shower as I have still not mastered the in-shower hair removal cream routine (it just comes off, or I am stood there like a naked melon in the shower for 10 minutes with no way of timing myself - i don't get it). So, on it goes before I ditz around playing on my phone, making a hot hot coffee for after my shower or whatever pleases you then bish bash bosh silkiest legs I've ever had!


So there we have it, part two. What is on your summer products list?


Wednesday, 11 June 2014

how to shower for dummies

Time to talk about how I wash myself - an obvious topic you all are dying to know about, I know. 

After a long 13 hour day out of the house there is nothing better than a hot meal followed by a hot shower. After a deep heavy sleep sometimes it's totally necessary to get up an extra 20 minutes early to wake your tired eyes up with a shower.


I love a good shower (I also love baths but I savour those hours with my book and a glass of wine for when I'm in the comfort of my family bathroom surrounded by mums candles and dads incense) and it is all about the products you use in there, are you actually washing yourself or just having a rinse? a body shower or a full hair-wash and leg-shave kinda shower? Either way my staple shower products at the moment consist of the below:


I start my shower by washing my hair - as most of you probably do - and I have always had good results with Tresemme. I have used every brand under the sun from Nicky Clarke and Color Wow to Herbal Essences and L'Oreal and I always come back to Salon Silk by Tresemee for some reason, it costs as much as Herbal Essences (another trusty hair brand I find) and normally I go for the huge bottles that last me forever. I have for the past year however used Lush shampoo bars and because it's not as easy for me to trek to my local Lush I have resorted in the past month to grabbing Tresemee again in Boots on my monthly store trips for work. Not to complain about Tresemee but the Lush bars last SO long I prefer them - they seem expensive for what you think they are at first, I wasn't 100% convinced - but they last about 3 months for me whereas a bottle of shampoo for almost the same price lasts 1 tops. Saying that I'm back on Tresemme and I love it :) My favourite bottled haircare.


This stuff smells like milkshake and sweeties - an obvious number one necessity when I'm picking out my body products. I've taken recently to completing my exfoliate, cleanse & moisturise routine on my body as well as my face. I want perfect soft skin for when I start my fake tan for summer regime (which will start soon) and for my month in a bikini in Thailand. So I've started the routine early determined to get myself smooth and buffed everywhere - this is working so far as this exfoliator is so perfect for me. It isn't harsh so it doesn't irritate my sensitive skin and it is just harsh enough to do a good job of buffing away dead skin. Perfect also for scrubbing away dirty night old instant tan!


I don;t always exfoliate in the shower but I always use this body wash - after a day at work where I am just about ready to collapse I love this (combined occassionally when I'm feeling really stressed and exhausted with the De-Stress Mind Bath & Shower Oil) to inhale in with the steam of my shower. It relaxes me so much and feels like magic unknotting all my knots, mind & body. I don't know an awful lot about Aromatherapy but I know I now love it. This particular scent is quite strong at first if you are not used to Aromatherapy but you get used to it after a couple of uses and you will find that you can't not have it in your shower. I tell you, I know I'm going to have to get more for my final year of uni!


Always use this - if I exfoliate or not. I reviewed it here against the Nivea verison with Cocoa Butter and it has actually become my favourite of the two. It's much less greasy and I can't deny I love the fact it's rich in Vitamin E (common knowledge this is my favourite beauty ingredient!)

So there you have it - you can now shower the Abi way (I hope it goes well for you all! ;) )


Friday, 30 May 2014

give your roots a boost

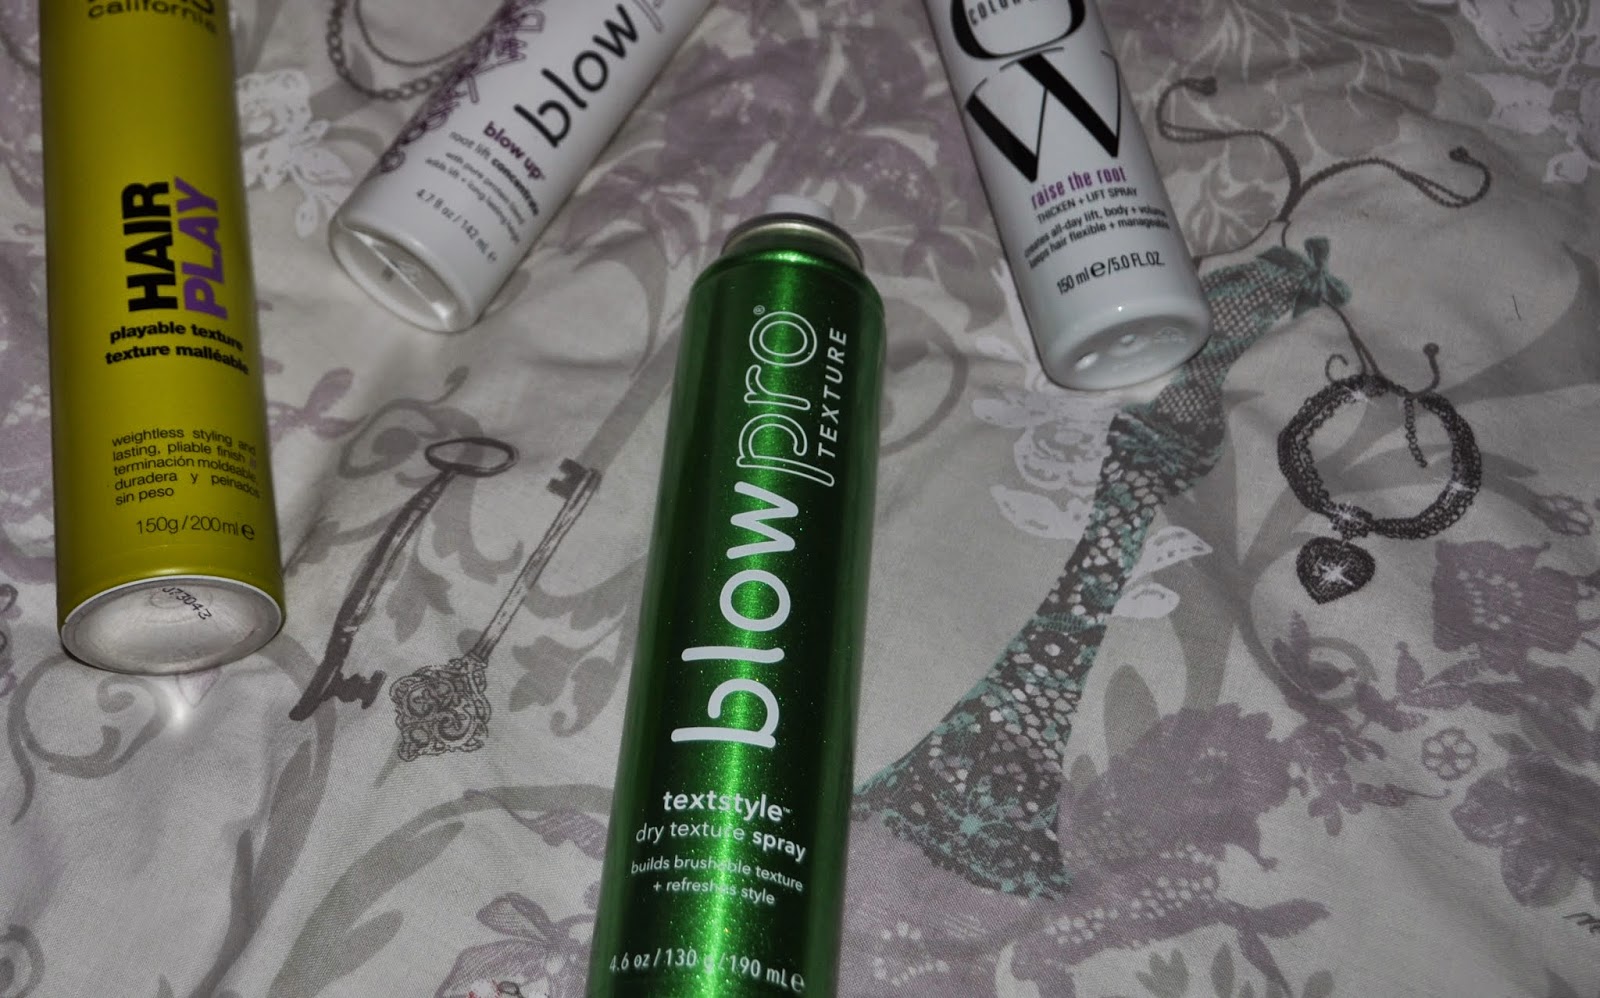
as a sworn hair volume lover I naturally have had my fair share of volumising products from Elnett hairspray to the essential hair comb over to my Schwarzkopf OSIS hair powder. I am an experimenter by nature, I am not always loyal to beauty products and thats why I rinse through so many and ended up writing a blog about my product experiences! Currently, and not in the least bit surprisingly I own 5 root lifting and texturising products.. so I am here today to review them for you and let you know if they are good as they say they are...

Spray this on your hair before you blow dry - concentrating on roots. The results are what you expect, volume but not too much oomph. This product isn't too sticky, is easy and light to use, and smells like the hairdressers (which I love). I really have nothing bad to say about this product, good results, lovely product. This is the more expensive option, but given how long it lasts and that you only need a few spritzes to get great results I would say it is worth the investment.


This product is used in the same way as the Color Wow product - spray directly on roots and blow dry upwards.  The advantage with this one is that it has a special pointed nozzle to make it easier to concentrate on spraying your roots. The texture of it is quite sticky compared to the lighter Color Wow one, however it gives more lift. - again this product smells great so when I blow dry my hair it smells & looks just like the hairdresser did it!


I've reviewed this product in my April Favourites, so it is obviously up there with the best of the best. the cream of the crop. I love this product, because it gives you an instant lift with dry hair - so there is no need for the effort and sweat of blow dry. I reallllyyy recommend it for girls with thin/flat hair. No backcombing necessary just powder beneath your top layer - scrunch and bumpf - and done. It's also in a handy tiny bottle so you can take it in your handbag on a night out too!


This spray has a dry powdery texture so it acts like the VO5 dusting powder and can be used in the same way, but you can also lightly mist it over your hair if it is feeling flat and silky to give it some juice and life! It's not as compact and full on as the VO5 so if you only need a light lift I'd go for this product instead of the more intense VO5 powder.


This texture spray isn't really for just concentrating on lifting your roots, it is for those of use with naturally thick hair who just want to be able to style and lift our hair out of its 'just blown dry flat and too silky' coma. Honestly, it is perfect for that and I will definitely be buying this product again.


What are your favourite root lifting and texturising products?


Monday, 12 May 2014

time saving in shower miracles

today I am reviewing two in shower moisturisers - one belonging to a well trusted brand and with one of the best smelling & softening ingredients ever and another own brand product with the skin healing & recovering ingredient i adore.


as soon as I saw the advert many months ago for Nivea's in shower moisturiser I was taken. I knew I had to give it a go - I always have to moisturise my skin and I often don't out of laziness. If I shower before a night out I always do my legs and forget about my arms, that do itch a lot. If I shower in the morning before work I just don't have time to do my whole beauty regime so I cut it way down to your basic shampoo and conditioning. Annoyingly, these are my favourite times to shower - so when this product was in a 3 for 2 offer in Boots I jumped at the chance.


not only are the results brilliant - I only have to moisturise my face post shower now! - it contains cocoa butter, which I'm sure has more benefits than just smelling fantastic. Given that my family are fans of Palmers Cocoa Butter I basically swear by the stuff, (looking up technical jargon now...), just as I thought - it is thought to have benefits such as reducing stretch marks and treating sensitive skin kindly. Two things I cannot live without in my moisturiser. 
the only downsides to this product is when I put it on it seems to disappear so quickly I have to dollop a load more on to really get it all over my skin, it also feels rather greasy at first (obviously acting a lot like a conditioner, you are supposed to wash it away) but I'm not 100% keen on that feeling.


well well well.. who knew? Superdrug's vitamin E range has rave reviews as far as I can see, and if you read my blog on the regular you will know that I adore anything with vitamin E. Like I have said many times it is the best healing ingredient of all healing ingredients. Beating cocoa butter with a barge pole and laughing in it's face kinda good. I only know this fact and swear by it, because my lovely auntie is a masseuse, so when I was having issues with my hips and arse growing to three times the size, and as a result of such, having major stretchmarks, she suggested I get a product with vitamin E in it and massage it into my stretch marks every night. I did and they went from nasty purple to white so quickly (I still do anything to get rid of them as they are still visible and the worst things ever).


this product in particular does split when you start to apply it, but it smells clean and fresh and has many proven to be great benefits from its wonderful ingredients. 

I can't decide which I prefer between the two - I have been switching between them for weeks to decide and I can't for the life of me. All I can say is - buy one (whether the slightly cheaper option or the trusted branded one I dont care). But if you know what's good for you, you will try one. And there are more out there! I've spotted one by Olay somewhere before, I'm sure there are more.

Happy hunting :) & Remember the names of the products will link you to where you can buy them.

Monday, 31 March 2014

contour-ime & prime time

the typical title for a post about primer! and a contour kit..

It's a big day for the blogeroo as it's been renamed and reloved. The reason I picked Paws and Claws was because I intended to stick to nail art, but when I realised how much of a beauty hoarder I was I realised it was best to put it to good use and share it with all of you. So now we are Curiouser and Curiouser, not only because it is one of my favourite quotes from one of my favourite films (Alice In Wonderland obvs) but because that is what I am, curious, about beauty! And by the looks of things you are too! :D

Here is a cheeky post on my new amazing additions to my make-up kit...

Primer is something I've never used before and never thought of using, it's not a staple you grow up with like foundation, mascara, blusher. A lot like my contour kit, it just never occured to me how much it would change my make-up.

The first primer I used was the L'Oreal Paris Lumi-Magique Primer (click the link to see it/buy it from Boots' website) which was undoubtedly great. It gave me a really nice illumination to my skin and cooled down the reds slightly. I loved it and it is one of my only empties! I would definitely recommend this for those of you with dull, patchy skin - it's especially good for winter when the weather really gets to your lumination.

However, now that summer has started (well kind of spring time-bursts of sun have seen me apply some sun cream) I have founded the perfect priming and mattifying product to stop my oily nose from getting in the way. The GOSH Prime 'n' Set (again click to grab it from Superdrug's website) is absolutely perfect for this! It hides all my imperfections, soaks up and unwanted oiliness on my skin and primes my face for my foundation. It's a lovely pale white as well, which means us pale skinned lot could wear it without foundation as it gives amazing coverage. I would 100% recommend this for all year round oily skin types and everyone during the hot summer season where all our skin gets a little 'sweaty'. 


Another new addition to my make-up bag is my Sleek 'Face Form' Kit (available if you click through to Beautifeye)- something I never thought I would understand or be able to do right is defining and contouring - but it's actually very easy, especially with this palette. You get a bronzer, highlighter and blusher. Personally I stick with the bronzer and highlighter due to my naturally rosy cheeks, but the option is always there and available for those without the blessed red glow I have grown up with. All you need to do is follow these four easy instructions when 'applying' your contours:


  • bronzer: Suck in your cheeks to define you cheekbones and dab a line of bronzer on the underneath of the bone. You can also apply to the sides of your nose, inner eye lid and jawline for extra contour-iness.
  • highlighter: again suck in your cheeks and apply the highlighter to the top of your cheekbone this time and under your eyes. Also apply to the edge of your chin, brow bone and centre of your forehead.
  • blusher: we all know where blusher goes (and the best way it suits us) add to the plumpest part of your cheeks to add some life to your skin - and always remember to keep it as natural as possible.
  • Like as said, as natural as possible is key here, you don't want it to look really obvious. So my top top with contouring is to BLEND - blend the hell out of your bronzer and blusher with a powder that matches your skin to keep yourself stunning and not camoflage. 
Hope these tips and new products that I love help you all look even more beautiful than you already are! Look out for these products in my make-up looks posts that will start in a few weeks time :)


Bah byeee xxxx

New tags for my social media life:
@curiousitybeauty for both Insta and Twitta

Saturday, 22 March 2014

scrub up well

I have got some many ideas for posts that I've actually had trouble choosing what to write up today! And this is just for beauty.. i do need inspiration for my nails however (Do not despair i will have a lovely tutorial up for you all tomorrow).

For now I want to show off my facial skin-care routine, including all the stages that I (now) do.. that's cleanse, tone, exfoliate, moisturise. The most important part of skin-care is finding products that suit your skin - condition and sensitivity. 


I have determined that my skin is mixed, I get oily around my t-zone (see below for a cheeky diagram on what this is) but dry and itchy around my jaw line and eyes. If you have mixed skin you can use the same products that I do - these products can apply to other skin types though so I will explain the qualities of each one and what makes them brill for your skin.


cleansing
This lotion is really good for sensitive skin, it's not harsh but still gets rid of all your make up. It works really well as an eye make-up remover as well (god knows I need that). Reading the back it seems to have a lot of vitamins and good ingredients for your skin especially good is Vitamin E. If you can get anything with vitamin E in it then it's good, you need as much of that stuff as you can get. It makes the appearance of scars and marks on your skin better and smoothes it out (I know this because my auntie who is a masseuse recommended it when I got some stretch-marks a few years ago). I use this in the evening and morning as well, to get rid of over night dirt - I use it right before I apply my make up as it also moisturises the skin lightly so you don't have to wait until you can apply make up (this you would have to do with normal moisturiser to avoid slippy foundation).

toning
I never understood what toning is, to me it sounds like a quick fix to great abs in a bottle (I WISH), but it unfortunately isn't. We tone our skin to get rid of any left over make up, dirt and dead skin cells. Sounds harsh right? Well actually it isn't too bad, I don't tone everyday as I find it irritates my skin and I end up moisturising a lot to compensate. But this Micellar Water is really good as it's quite gentle so I use it 3-4 times a week to keep my skin supple and firm. It's actually a 3 in 1 formula, so it is a cleanser, toner and refresher - which is great! I know it's doing it's job and there is no need to rinse it off. I would suggest using this daily if your skin is tougher than mine (or normal) just don't get it in your eyes! 

exfoliating
I didn't ever bother exfoliating regularly until recently, my skin has been breaking out left right and centre and i had enough, so I went straight to the Freederm section, and I am so glad I did.
This product is meant for spot prone skin so you know it's going to do you some good, it combats blackheads and works quickly. I started using it daily and my spots started to clear up and blackheads appeared .. well.. less black! within a week. I use this in the evening after I've cleaned all my make-up off. There is a sensitive one available which I didn't realise, but I would say if you have mixed skin this one will work just fine as it's not irritating unless you over scrub. I did over-exfoliate (something I didn't think was possible) and mustn't have moisturised properly so I ended up with really dry skin around my nostrils, make up really irritated it so be careful!

moisturising
I swear by Nivea for moisturising, I also have the in shower moisturiser which is lush!, I normally would get Nivea Soft but have recently been using this and it does the job just fine... until I go grab my next batch of Nivea Soft. I love this one because it absorbs really fast so I don't have sticky skin when I go to bed, which is when I do most of my routine. I tend to cleanse as soon as I get in from work and then leave everything else till I am getting ready for bed. I've always moisturised and everyone should, it's so important especially if you have dry patches of skin. You can also get good mattifying moisturisers that are made for oilier skin (so if you do have oily skin there is no excuse!)

extra caring
I love a good face mask every now and then, when I have a couple of hours to really pamper myself. And what better way to do than with a little dead sea mud? This mask is really nice and my skin feels so soft after I use it, I even think my blackheads look better. I would recommend this if you do get bad blackheads. If you aren't a mask kinda person, you don't need to go whole hog, just put it on your worse areas (or t-zone) while you are in the shower and wash off within 5 minutes - easy peasy.

N.B. Drink as much water as possible, it's so good for your skin I can't explain! I try and drink a large bottle  (don't ask me how many litres it is) a day through the week and I treat myself on the weekend and evenings to juice and iced tea hehe!

Have fun cleansing ladies!
xxxxxx

@pawsandclaws101 for insta
@pawsnclaws101 for twita


Thursday, 27 February 2014

bat those lashes

Thought today I would let you in on a little make-up secret of mine. One thing I could not do without on a daily basis is mascara - I have the blondest eyelashes that are literally invisible.

And so I have tried so many mascara's in my time always bouncing from one to another trying to work out which is best and I like a lot but my favourites are the ones I currently own (and need to re-purchase!). Before I tell you about them though I wanted to tell you about a little trick of mine that gets the mascara to apply nice and thick and sleek with no lumps and bumps. 

It's called Vaseline ladies, yes, vaseline can be used for pretty much anything (I say vaseline but I mean petroleum jelly). I used to and still do watch make-up tutorials and yearrrrs ago, we are talking donkeys, when I started using mascara the three tips that stuck with me are as follows:

1. Hold your mirror low/tilt your head upwards to that you can avoid getting mascara on your eyelids
2. Shake your brush from side to side after a few strokes to get your lashes to split from one another
3. And always apply vaseline to your lashes before putting the mascara on - don't ask questions just do it

And a new tip that I need to invest in as soon as possible is one passed on by my lovely best friend Juliette, when I was telling her about my vaseline trick she told me that she uses coconut oil on her lashes (or at least she had heard of it). More specifically, she had the Superdrug own brand one on her bed side table, it was a waxy texture and smelt lovely (looking online here it is only £2.29). However, upon doing more research it is rumored that vaseline makes your lashes grow also .. So hey presto, another amazing reason to listen to my advice!!


My favourite mascara at the minute and I think ever acutally is the Rimmel London Scandal Eyes Retro Glam - My eyelashes look so so so long, now I don;t know if they are and the mascara is the only one that covers them all or if it is a case of lengthening in the mascara?, either way I love it. The brush hugs all your eyelashes that makes it so easy to get all the little iddy biddy ones in the corners (even though it is what I call a bushy brush which I don't normally like).


Another one I love at the minute is the Max Factor Eye Brightening for Blue Eyes mascara - It's brush is a type I've always loved, its straight with little spikes and it super thin so again easy to get into all the difficult places your eyelashes like to hide. I don't know about the whole 'eye brightening' idea, at first it excited me but really I don't see a different. However I do like the mascara a lot a lot so maybe it does do something different.


The final one is a newby to the bunch - a little tester that I am considering to be my next mascara buy! - it is the Urban Decay Supercurl Curling Mascara. The brush curves right around your eyes - maybe even better than the Rimmel one - and is thin and spiky the way I like it! It goes on well, comes off well and doesn't crust off over the course of the day (which I find happens with the Max Factor one). It's perfection in a tiny weeny tube.


Which mascara do you like best?

xxxxxxxxxxxxxxx

@pawsandclaws101 - Instagrammmmm
@pawsnclaws101 - Twitterrrr

Tuesday, 21 January 2014

lace & frills tutorial

So.. I missed out on posting yesterday and I feel terrible! I was doing so well.. so to make up for it here is a tutorial...

Todays tutorial is my simple lace design...

This design is so easy to do.. all you need is below:

  • 3 colours of nail polish (preferably one colour for the base and two shades of one colour for the detail) 
  • a dotting tool/needle
  • base/top coat
  • a steady hand


For my 3 colours I chose GOSH polish in High school flirt, Max Factor Gloss Finity in lilac lace and B. polish in Mulberry.


Step 1: Apply generous coat of base colour. 
Step 2: Using the large dotting tool add a cloud of your second colour to the tip of the nail. 
Step 3: Using a very small dotting tool/needle dot two lines of small dots along the edge of the cloud in the third colour you have chosen. 


Step 4: Add medium dots of the base coat to the cloud at the tip of your nail to create a 'holey effect'
Step 5: Using a the small dotting too again, in the third colour, dot and drag to create teardrops at the edges of your design.
Step 6: Top coat and breathe ..


Tah dah!

Let me know if you have a go at it @pawsandclaws101
Check out my instagram for more designs and other fun bits and bobs :)

Abigail xxx